Dollar Tree Tabletop Fire-pit

PREP TIME: 7 Minutes TOTAL TIME: 35 Minutes

Crafter Level: Intermediate

  • Dollar Tree Chopping Mats (comes in a pack of two)
  • 3 Dollar Tree “Crafter’s Square” Wooden Trays
  • 4 Dollar Tree White Marble Accent Stones
  • 3 Dollar Tree Handi Heats
  • Black Spray Paint
  • Gorilla Glue or Hot Glue
  • Hot Glue Gun
  • 6 Dollar Tree Clamps
  • Scissors
  • Ruler or Tape Measure

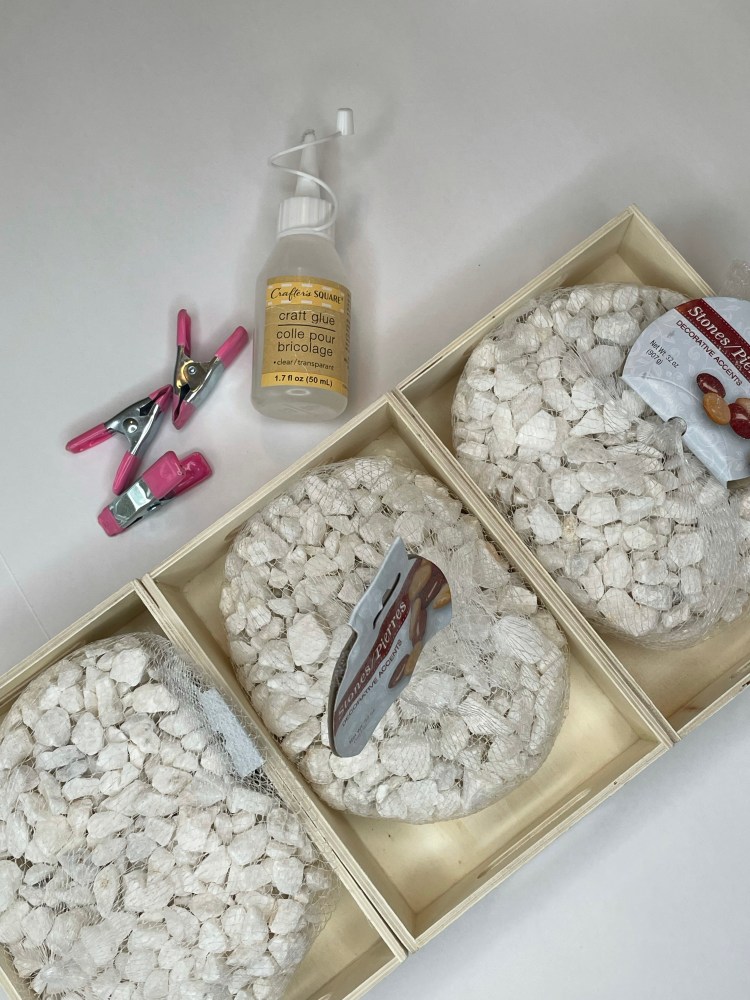
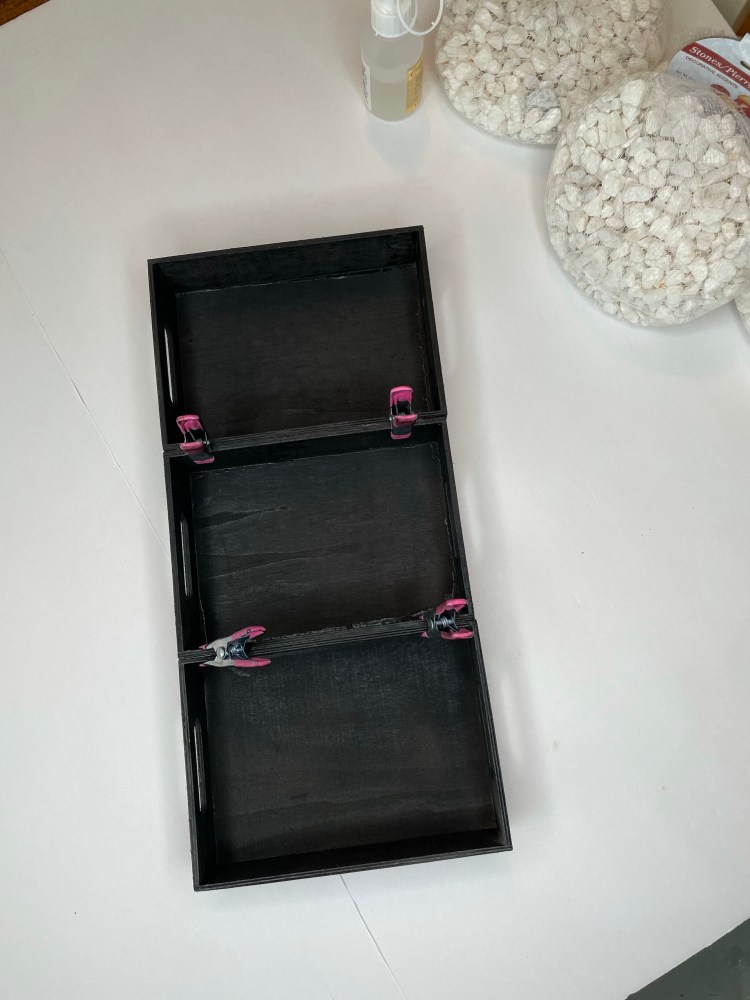
Step 1: Plug in your glue gun and arrange the three wooden trays side by side so they are adjoined long ways. Glue the trays together so you have three consecutive trays side by side creating a long tray with three sections. Clamp the trays together and let dry for five minutes.

Step 2: After the glue has hardened, remove the clamps and spray paint the top and the bottom of the long tray with spray paint. I used Rustoleum Canyon Black in Satin for a low sheen. Let dry.

Step 3: Cut four 4″ strips of the Dollar Tree Chopping Mat (long side totaling to about 20.25″ long and 4″ deep and shorter side of tray 4.75″ long and 4″ deep). Now you will need to line up the long strip with the long side of the tray and cut slits where the trays meet so to create a flap to cut off, and cut off any excess length so that the wall of the tray is snug. The short side will just need to be cut 4.75″ long and 4″ tall. Glue the long side of the chopping mats to the tray and repeat with the shorter, each going 2″ deep and having a 2″ perimeter serving as the wall. Glue the corners together as well.

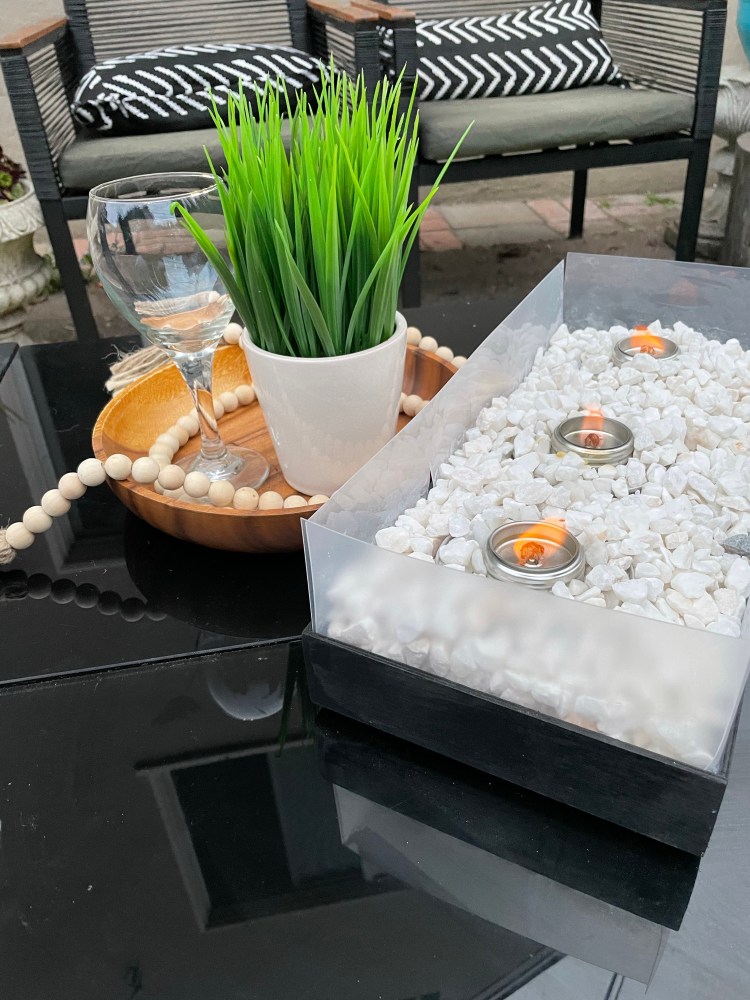
Step 4: Place one Dollar Tree Handi Heat in each section of the tray. Cover Handi Heats with the four Dollar Tree White Marble Rocks.

Step 5: Unscrew the tops of the Handi Heats and place in a memorable place and enjoy!

Each Dollar Tree Handi Heat has a 2.5 hour burn time. Do not let the Handi Heat burn unsupervised.

Customized Wedding Song Shadowbox

PREP TIME: 2 Minutes TOTAL TIME: 15 Minutes

  • Dollar Tree Stackable Organizer
  • Dollar Tree Ribbon (your preference)
  • Computer with Word (or application that has the same functions)
  • Printer
  • Printer Paper
  • 4″x4″ Picture
  • Scissors
  • Hot Glue Gun
  • Glue Stick

There is no better way to exhaust the human spirit, than with the expression of art and love.

THE POPPIN MAMA

Step 1: Open Word and hit return until you reach the 4.5″ marker of the left ruler. Type in your wedding song in Arial size 12. Enter a hard return and write the name of the artist of the song in all caps.

Step 2: Insert a line from “shapes” and place it directly under the song name and artist (the default is blue, which is what I used). The line should be 4.5″ long, measuring with the ruler on the top of the page.

Step 3: Under the line, write how many seconds you want to show played then tab over to the end of the line and enter the total minutes of the song.

Step 4: Next you will insert a triangle from “shapes” and duplicate the triangle four times under the “time” of the song. Drag the first two triangles to under the total time of the song and rotate so that they are side-by-side and pointing with the longer end to the right (I made the triangle a little longer on one end to accomplish this). Repeat this for the left side right under “time played” and rotate the images so that the longer side is pointing towards the left of the paper. For the last triangle, place it under the middle of the line, ensuring it is is slightly larger than the double triangles.

Step 4: Print on computer paper, then place the stackable organizer on top of the paper with the “track song” all the way at the bottom of the long side, with about 3″ of space of the top. Cut along of the perimeter of the paper (this will be inserted into the organizer behind the drawer insert.

Step 5: Cut the 4″x4″ picture into a 3.5″x3″ square and glue it over the “track song” centering it from the edges of the rectangular paper you just cut.

Step 6: Place the paper and inside the drawer organizer and put the drawer insert inside of the organizer over the paper.

Step 7: Tie a bow and hot glue it to the knob of the drawer. Place as a shelf display or save as a bedside memento.

Memento Shadow Box

Prep Time: 3 Minutes Total Time: 25 Minutes

  • Dollar Tree Stackable Organizer
  • Dollar Tree Lazer Cut Keys
  • Dollar Tree Craft Pearls
  • Dollar Tree Craft Gems (available in red, blue, or clear)
  • Dollar Tree White Doilies
  • Dollar Tree Sheer Ribon
  • One 4″x4″ Picture
  • Hot Glue Gun
  • Scissors
  • Glue Stick
  • Poster Board (optional)

Step 1: Remove the drawer insert of from the drawer organizer and trace the bottom the perimeter of the drawer over the doily. Cut out the doily and glue it to the inside of the insert.

Step 2: Cut your 4″x4″ picture into the shape of a heart and leave as is or paste it onto poster board (optional). Paste the picture onto the doily using a glue stick to lather the back of the picture.

Step 3: Place the lazer cut keys, a handful of craft pearls, and craft gems inside the drawer insert in front of the doily and picture. Put the drawer back into the stackable organizer box and place the box on the back end face up (knob of the drawer should be on the top of the box so that you can pull up on the knob rather than sliding it out).

Step 4: Glue on a gem to each corner of the bottom of the organizer, pointy side facing down.

Step 5: Finish off the look with a sheer ribbon, gluing it to the front of the knob of the organizer drawer. Stage by placing it on a mantel or bedside table.

Dollar Tree Backdrop

Photo by Daria Shevtsova on Pexels.com

Prep Time: 5 Minutes Total Time: 10 Minutes

  • 4 Dollar Tree Foam Boards
  • Dollar Tree Duct Tape (white preferably)
  • 3 Different Contact Paper Designs
  • White Dollar Tree Duct Tape
  • Scissors
  • Sharp Blade
  • Credit Card

Step 1: Lay two of the foam boards on a flat surface side by side so that the longer sides are touching. Duct tape the two ends together right down the middle making sure that there are no air bubbles as you slowly marry the two sides together. Cut the ends of the tape off so that the tape is flush on both ends of the foam boards. You should be able to close one foam board over the other like a book.

Step 2: Close the two foam boards like a book, then align the third foam board to the taped hinge side of the panels. Next, duct tape the completed side to the foam board on the right, duct taping the long sides together. Cut off the remaining duct tape from the edges of the hinges with scissors. Close the “book” again and line up the fourth foam board on the right side (long edges lined up together) and the stacked side on the left. When you are done you should have three perpendicular backdrops that you can flip open like a book.

Step 3: Flip all the way to the front set of taped panels, where you have one panel lying on the right and you should have the three remaining panels on the left. Pick your first contact paper design to lay out and cut. Unroll the contact paper and measure against the foam board to see how long you need to cover the entire foam board. I had to cut a total of three contact paper panels to cover the two foam board pieces.

Step 4: Next you’ll want to expose 1 inch of the contact paper and lay it down on top of the foam board at the left edge of the foam board panel. Then you are going to slowly remove the backing of the contact paper simultaneously wiping the bubbles out in a downward motion. I used my hand for this but you can also use something flat like a credit card. Fill the entire space with contact paper.

Step 5: Clean up the edges of the foam board using the blade to shore up the contact paper with the foam board.

Step 6: Flip the page to the next blank and cover with you second design. Repeat Step 4 for the next two panels.

Blog at WordPress.com.

Up ↑